(Latest update: Jan-31-2022)
Both items are key elements to the project.
Objective
After reading this article you should know how to manage
- different types of audio interfaces
- the audio interface setup
- and the related squeezelite setup
finished with this chapter.
There are basically two relevant types of external audio interfaces for the RPI.
The rather less relevant types of audio interfaces such as
With a bit of community pressure some of the manufactures might consider to start looking into it! I addressed it with the Soncoz SGD1 designer some time ago. But Gustard, Topping Denafrips !?!? It's your call. Simply ask for it, push them.
Why all that? You simply wouldn't need an IR remote or on-DAC switches and control panels anymore. Everything should be manageable via app or browser - that's be the goal here.
Writing and maintaining drivers is a hell of a job. Not every small company is capable of writing a driver. And even more important not every small company is able to afford its production and maintenance.
This situation lead to different approaches.
There are quite a number of I2S-HAT audio interfaces available. You'll find everything
from entry level devices to audiophile audio devices out there.
HAT audio interfaces with advanced drivers offer special features. Such as
It's IMO very important NOT to neglect these options. E.g. selecting the right filter on your DAC can make quite a difference to the resulting performance of your audio device.
pCP must and will reboot to enable the audio device driver for your audio device.
After the reboot you can continue with...
Several Audio DAC devices ( I2S or USB) offer "Card Control" setting options.

Update to above shown settings options in line with your own DAC.
To do the initial setup properly follow below order:
After that reboot the RPI and verify that all settings are loaded as you've selected them!
The setting process is a bit awkward. Lots of SAVE and reboots.
Now comes one of the most important tasks. We need to properly configure squeezelite.
squeezelite offers quite a number of options. Not all of them are required.

the Alsa interactions with the audio device.
The first field takes the Alsa (ring-) buffer setting. That buffer is the last buffer between
the RPI OS and the audio device. This buffer plays a very important role.
E.g. if you experience clicks, scratching or in developer terms XRUNS (buffer underruns), it might help to change the buffer-size. The smaller the size the higher the risk you'll be running into XRUNS.
One of the main subjects is that I2S-HATs and USB DACs need different
buffer settings. I2S drops off right from the CPU. It therefore can run with very low buffer sizes.
USB DACs come with a very complex communication channel on different layers.
And that gets worse if you run asynchronous USB DACs. Asynchronous USB DACs
are no realtime DACs! An OS needs to change its internal sample-rate slightly to cope
with this. Ok. That's under the hood. Usually we do not care how an engine is working.
I2S-HAT buffer
These settings work for pretty much all I2S HATs I tried. You can also try
2^15 = 32768 - that's what I've been running nowadays.
I prefer to stick with the 2 exp something scheme. Alsa will adjust the buffer
size to a feasible value anyhow.
The Alsa buffer is a system layer buffer that connects the OS-Audio layer with the audio HW.
The squeezelite buffers are application internal processing buffers.
squeezelite offers two processing buffers
How it works.
squeezelite puts the received audio data stream taken from the OS network layer into
the stream buffer first. The OS itself also has buffers for managing its network stack.
These networking buffers are even being used before the stream hits squeezelite.
A typical CPU load during RAM playback will be around 0.3% on a RPi 4B.

Basically "-W" allows server based resampling on PCM streams.
Basically "-V Master" controls the "Master" volume control as being offered by the driver.
The name "Master" is freely chosen by the designer who wrote the driver.
For the Allo Boss it would be "-V Digital".
I use this HW VC to avoid having two digital volume controls (squeezelite+DAC) in
the loop.
Enjoy.
The Audio Interface
There are basically two relevant types of external audio interfaces for the RPI.
- USB Audio Devices
- I2S-HAT Devices
The achievable audio performance - for obvious reasons - strongly depends on the audio interface of choice. However. My experience shows that no matter how expensive an audio interface is, in relative terms you'll experience a worthwhile audible impact on your audio performance by changing resp. optimizing this or that software setting.
- RPI Internal audio
- HDMI audio devices
- SPDIF audio devices
- Bluetooth audio devices
are not covered in this article. Why?
To get a Audio DAC sounding really nice via Bluetooth is a pretty challenging undertaking. There are still technical limitations (compression) you simply can't get around. Achieving the same perceived sound quality as done via USB or HAT audio interfaces is difficult. Bluetooth and Airplay and so on can very well be used for occasional car/bathtub/kitchen blubbering .
And there's IMO no reason to go SPDIF. It's a lot of effort to get going at highest quality at basically no gain. You can consider yourself lucky if your DAC performs as well as it does over USB. However. SPDIF is still used on multichannel or active digital systems. It's not yet dead.
USB Audio Devices
Compliance
USB audio devices attached to the RPI will be driven by the standard Linux - so called Class Compliant - USB audio driver.
Therefore pretty much all state-of-the-art USB DACs should work on the RPI.
Keep in mind though!
Not all "Class Compliant" DACs are actually 100% compliant. This might cause
issues with this or that DAC.
Keep in mind though!
Not all "Class Compliant" DACs are actually 100% compliant. This might cause
issues with this or that DAC.
Quite a number of these "almost-compliant" DACs do function because of so called quirks that have been added to the Linux USB audio driver in the past. That driver is integrated into the Linux kernel. These quirks usually apply to a single "almost-compliant" DAC only. It'll be pretty tricky for a fellow audiophile to get such an issue under control if it pops up. Luckily there are not that many "almost-compliant" DACs out there anymore.
Pretty much all USB DACs out in the market, claim beside "Class Compliancy" Windows and OSX compliance. Nobody speaks of Linux. Don't let that distract you. What matters is "Class Compliance". And the Linux Alsa USB audio driver folks claim class compliancy.
Pretty much all USB DACs out in the market, claim beside "Class Compliancy" Windows and OSX compliance. Nobody speaks of Linux. Don't let that distract you. What matters is "Class Compliance". And the Linux Alsa USB audio driver folks claim class compliancy.
RPI land is obviously Linux territory. Since Android (a Linux kernel based system) increased its footprint dramatically in the OS world, more and more manufacturers keep an eye on compliance towards Linux. Nice developments.
USB DACs do not offer much, if any, control features via the generic USB audio driver under Linux. Therefore most HW related settings, such as volume control, output or filter selection,
will have to be done on the DAC itself via IR, switches, knobs or display and can't be done from an application or web browser.
DAC manufacturers could quite easily implement certain features, such as on-DAC volume control via USB. Recently e.g. the Khadas ToneBoard folks have done it. Allo offers the full range of controls via driver for the Revolution DAC. And there are more. All I am saying -
don't count on it.
With a bit of community pressure some of the manufactures might consider to start looking into it! I addressed it with the Soncoz SGD1 designer some time ago. But Gustard, Topping Denafrips !?!? It's your call. Simply ask for it, push them.
Why all that? You simply wouldn't need an IR remote or on-DAC switches and control panels anymore. Everything should be manageable via app or browser - that's be the goal here.
Powering
There are usually three powering modes that come with USB DACs:
- bus-powered - which uses the RPI USB connection as power source
- self-powered - which requires a separate power supply
- mixed-powered - it's a mix of 1+2.
Usually just the "dirty"/receiver side gets powered through bus-power and the clean side inside the DAC gets clean external power - ( and there's one more type which simply requires USB power only to identify that the
client is up'n running. But that's not really a powering mode )
Attaching a bus-powered or mixed-powered device to the RPI is not such a good idea.
You'll put quite some extra load and stress on the still rather weak thus sensitive RPI infrastructure. The RPI power rails get shared with the USB power rails.
If you want to attach a bus-powered USB DAC better try to get the device externally powered.
You'll put quite some extra load and stress on the still rather weak thus sensitive RPI infrastructure. The RPI power rails get shared with the USB power rails.
If you want to attach a bus-powered USB DAC better try to get the device externally powered.
For those who run bus-powered devices: There are plug-in USB-adapters which allow to power a bus-powered USB DAC externally. Even an externally powered USB hub would do.
Last but not least...
Last but not least...
Performance
The RPIs major weakness used to be their joint USB2.0 Ethernet infrastructure.
That dramatically changed with the introduction of the RPI4.
That dramatically changed with the introduction of the RPI4.
I consider the PI4 USB performance that good, that I switched back from I2S-HAT audio to USB DACs after running I2S-HAT DACs for several years .
You should also have a look at USB filter gadgets. Have a look at my system. These can really make a difference. I also use them to inject clean power towards the DAC.
You should also have a look at USB filter gadgets. Have a look at my system. These can really make a difference. I also use them to inject clean power towards the DAC.
And I also use them on my attached SSD! The filter and power injector.
These gadgets eliminate quite some noise and some of them refresh and even repower the stream. This can have quite an impact on the audio performance.
Keep in mind though. The better the audio device is protected against USB induced distortions, the less impact you'll see from these filter devices and/or cables.
Keep in mind though. The better the audio device is protected against USB induced distortions, the less impact you'll see from these filter devices and/or cables.
If you buy one of these gadgets make sure you can return them. Highest quality DACs - these with focus on cleaning up the input properly - simply don't care if there's 30 dB more or less noise on the bus.
Summary
Running USB DACs on the RPI4 must be considered a very valid option. Especially when using most current excellent DACs, such as e.g. the Khadas Toneboard (to be externally powered!), Gustard, SMSL, Soncoz where the IMO (serious) fun starts at very reasonable price levels (check out the Audio Science Reviews). As usual the sky's the limit.
If you consider to run a USB DAC on the RPI4, I recommend to
You IMO can end up with a very nice sounding USB audio setup.
Such a setup usually can very well compete with whatever (commercial) USB streaming solutions/bridges out there.
Let's have a look at the 2nd audio interface option.
If you consider to run a USB DAC on the RPI4, I recommend to
- run 100% externally powered USB DACs only
- avoid as much DSP jobs as possible
- try one of the USB filter gadgets (reclockers/filters)
- look for a quality cable
Such a setup usually can very well compete with whatever (commercial) USB streaming solutions/bridges out there.
Let's have a look at the 2nd audio interface option.
I2S-HAT Audio Devices
HATs, are Hardware Attached on Top devices. It's a very nice way to extent the RPI functionality. These boards get attached via the 40 pin GPIO header.
The GPIO header provides
That list looks like an invitation to attach a DAC directly to the RPI header. By doing that we can get rid of the in many ways challenging USB stack altogether.
The GPIO header provides
- 5V and 3.3V power rails
- I2S (music)
- I2C (data/control)
- free configurable pins
BTW. You should know that also your external USB-DACs are actually "I2S DACs". The USB interface chip, mostly seen from a company called XMOS - actually a computer on it's own - simply extracts PCM data from the USB stream and outputs them as I2S signals towards the DAC chip.
Compliance
I2S-HAT DACs also require an audio device driver. No sound without driver!
These drivers are not that generic - like the usb audio driver. Every HAT DAC manufacturer
has to look closely into the driver business.
Writing and maintaining drivers is a hell of a job. Not every small company is capable of writing a driver. And even more important not every small company is able to afford its production and maintenance.
This situation lead to different approaches.
- some I2S-HATs work with generic I2S drivers >> very basic, no special features
- a few come with dedicated drivers >> introducing special features, such as volume control, filter selection, I2S-master mode, etc.
- and some manufacturers simply make use (piggyback) on the dedicated drivers
provided by other manufacturers
from entry level devices to audiophile audio devices out there.
Recently the evolution in the I2S HAT segment seems to be slowing down though. It actually
almost died. Many people out there seem to like the I2S-HAT-SPDIF option for connecting the DAC via SPDIF. Not idea why these people wouldn't use USB instead. Anyhow.
The audio quality you can achieve depends on the quality of audio device you'll attach.
The RPI causes high jitter on I2S and also contributes plenty of noise. You basically can't use - if you look for serious audio - the RPI offered interface and power without cleaning it up.
The audio quality you can achieve depends on the quality of audio device you'll attach.
The RPI causes high jitter on I2S and also contributes plenty of noise. You basically can't use - if you look for serious audio - the RPI offered interface and power without cleaning it up.
High quality HAT audio device manufacturers have been introducing numerous measures to cope with that situation.
There are I2S reclocker and isolator HATs available, which are sandwiched between a DAC HAT and the RPI. These devices can deliver extremely low jitter ( single digit picoseconds ) and very low noise levels. These special devices are serious stuff - no toys!
HAT audio interfaces with advanced drivers offer special features. Such as
- oversampling filter selection
- internal volume control
- output selection
- ...
Using the internal volume control of a DAC could allow for DSD volume control, ...
Lot of talk. Let's get something done...
Go to the pCP Squeezelite Settings menu. First we need to configure our audio interface.
Lot of talk. Let's get something done...
Audio Interface Setup
Go to the pCP Squeezelite Settings menu. First we need to configure our audio interface.
Note:
The squeezelite settings will always be overridden when changing the "audio interface".
Keep an eye on what's being configured and what has changed!
Keep an eye on what's being configured and what has changed!
If you don't find your audio interface listed you should issue a question in the pCP related forum threads out there or ask your manufacturer.


Audio Device selection
USB
Audio-HAT

Select your audio device of choice. And save it NOW.
pCP must and will reboot to enable the audio device driver for your audio device.
After the reboot you can continue with...
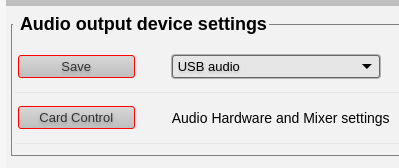
Card Control
The audio driver makes these accessible. Basically you can program all kind of features right on your audio device.
As mentioned earlier, if all manufacturers would makes these features accessible there'd be no need for IR/BT remote controls or switches and displays on a DAC. Which a. would
make it more convenient for the user and b. would save a lot of cost for the manufacturer tuning into potentially better prices.
NOTE:
pCP does not necessarily offer all card control options that's been offered by the device!!!
NOTE:
pCP does not necessarily offer all card control options that's been offered by the device!!!
To lookup and to access ALL options you'd need to ssh into pCP and run a program called "alsamixer" or "amixer" from commandline. Most basic options are usually covered through pCP though!
A widely used DAC family for the RPI is the Texas Instruments PCM51xx DAC family.
It's being used on e.g. the Allo Piano2.1, Allo Boss, several HifiBerrys, IQAudios asf.
For these DACs you'll find several parameters/features to play with.
Below printout shows my preferred "Card Control" settings for the Allo Piano 2.1. A very similar setup you'd find e.g. for the other DACs of that PCM51xx family.
Update to above shown settings options in line with your own DAC.
NOTE:
Before you continue. If you have enabled HW volume control (-V) in the squeezelite settings section, take it out before you start doing changes in the "Card Control" section. I ran into a very strange behavior during the setting process.
Before you continue. If you have enabled HW volume control (-V) in the squeezelite settings section, take it out before you start doing changes in the "Card Control" section. I ran into a very strange behavior during the setting process.
To do the initial setup properly follow below order:
- Disable the "RPi BuiltIn Audio" first and then reboot!!
- Now you configure the Dtoverlay parameter options - if applicable
- Now you do the other settings
After that reboot the RPI and verify that all settings are loaded as you've selected them!
The setting process is a bit awkward. Lots of SAVE and reboots.
Squeezelite parameters
squeezelite offers quite a number of options. Not all of them are required.
I do avoid the entire resampling part. For those who want to run and extent the setup to DSD/DOP I've written a separate article. You can do that later on.
There's quite a number of squeezelite parameters to look at. The "more" option inside the WEB UI will give you further explanations.
Let's see what I've been doing.

There's quite a number of squeezelite parameters to look at. The "more" option inside the WEB UI will give you further explanations.
Let's see what I've been doing.
HAT DAC
USB DAC

1. Name
Choose whatever you like >> 1 string - alphanumeric - no spaces
finished with the Audio card control settings.
These automatic default settings can also be replaced with standard Alsa terminology
as shown above.
I choose "hw:0,0", which selects the audio card 0 with subdevice 0 in "bitperfect" (hw) mode.

which would address the device layer without going through the PCM abstraction layer.
2a. Output setting
Usually picoreplayer fills in the default audio device name automatically, once you'refinished with the Audio card control settings.
These automatic default settings can also be replaced with standard Alsa terminology
as shown above.
I choose "hw:0,0", which selects the audio card 0 with subdevice 0 in "bitperfect" (hw) mode.
2b. Output setting USB

Choosing the right output for your USB card is not necessarily self-explaining. If you have
disabled the RPI internal audio and you've only connected the USB audio interface it gets the "index 0". Let's keep that in mind. Linux starts counting audio devices at index 0.
What you see in a above screenshot is the dynamic help menu which changes with the attached audio interface. It doesn't show the the actual audio device, it shows so called PCMs. PCMs are virtual Alsa devices, an abstraction layer above the actual device layer. Pretty much all, except one, of these PCMs can be ignored on modern DACs.
For modern DACs the relevant choice is the one you see being selected. It gets you straight to the DAC.
hw:CARD=xxxxxxx,DEV=0
The xxxxxxx will change with the audio interface. This setting makes sure that you get bit-perfect data to the DAC.
This setting is an alias for
hw:0,0
The first 0 in above example reflects the card index 0 I mentioned earlier.
Now. Not all DACs are equal. You might have noticed that I said "modern" DACs. Modern Class Compliant DACs support all kind of bit depths you throw at them. And on the other side applications do allow to feed DACs with data they are able to swallow.
In the nowadays very rare cases where this doesn't work. You'd need to try different PCMs.
Start with:
plughw:CARD=xxxxxxx,DEV=0
In 99% of the cases these options should get you going.
3. Alsa output settings
These are Alsa - The Linux sound-layer specific settings. These settings definethe Alsa interactions with the audio device.
The first field takes the Alsa (ring-) buffer setting. That buffer is the last buffer between
the RPI OS and the audio device. This buffer plays a very important role.
E.g. if you experience clicks, scratching or in developer terms XRUNS (buffer underruns), it might help to change the buffer-size. The smaller the size the higher the risk you'll be running into XRUNS.
One of the main subjects is that I2S-HATs and USB DACs need different
buffer settings. I2S drops off right from the CPU. It therefore can run with very low buffer sizes.
USB DACs come with a very complex communication channel on different layers.
And that gets worse if you run asynchronous USB DACs. Asynchronous USB DACs
are no realtime DACs! An OS needs to change its internal sample-rate slightly to cope
with this. Ok. That's under the hood. Usually we do not care how an engine is working.
I2S-HAT buffer
- Buffersize = 65536 (=2^16 bits)
- Periods = 4 (buffer will be divided into "4" chunks (=periods))
- Bit depth = (empty = automatic)
- MMAP = 1 (enabled -> device memory access)
These settings work for pretty much all I2S HATs I tried. You can also try
2^15 = 32768 - that's what I've been running nowadays.
I prefer to stick with the 2 exp something scheme. Alsa will adjust the buffer
size to a feasible value anyhow.
Keep in mind. There's a catch. The smaller the buffer, the higher the number
of HW interrupts. We need to find a proper balance on that one for a smooth ride!
If you'd run on a terminal:
it'll show what buffer size is actually being used by Alsa.
USB DAC buffer
Buffersize = 120 ms ( or I run 132072 nowadays)
Periods = 4 (buffer will be divided into "4" chunks (=periods))
Bit depth = (empty = automatic and usually 32bit)
MMAP = 1 (enabled -> device memory access)
Due to the very complex nature of USB rather small buffers will cause XRUNS.
If you experience pops, clicks, XRUNS you better increase the buffer-size.
General notes:
If you'd run on a terminal:
cat /proc/asound/card0/pcm0p/sub0/hw_params
it'll show what buffer size is actually being used by Alsa.
USB DAC buffer
Buffersize = 120 ms ( or I run 132072 nowadays)
Periods = 4 (buffer will be divided into "4" chunks (=periods))
Bit depth = (empty = automatic and usually 32bit)
MMAP = 1 (enabled -> device memory access)
Due to the very complex nature of USB rather small buffers will cause XRUNS.
If you experience pops, clicks, XRUNS you better increase the buffer-size.
General notes:
The bigger the Alsa buffer the longer the latency. That means that the
response after triggering a volume change takes longer the bigger the buffer.
response after triggering a volume change takes longer the bigger the buffer.
If you's apply my 132072 you'll notice that slight lag.
Running very small buffers is not recommended. You need to know that the smaller the buffer
the higher the hardware interrupt rate.
That's not good. A high number of HSW interrupts loads the CPU. Abd is causing other process to wait.You basically need to find a good compromise. Rather small buffer + rather small number of interrupts. (Just follow my recommendations)
These buffer settings shouldn't be mixed up with the Alsa buffer settings you just read about !
4. Squeezelite buffer settings
These buffer settings shouldn't be mixed up with the Alsa buffer settings you just read about !
The Alsa buffer is a system layer buffer that connects the OS-Audio layer with the audio HW.
The squeezelite buffers are application internal processing buffers.
squeezelite offers two processing buffers
- the stream buffer
- the output buffer (output from squeezelite >> Alsa system layer!)
How it works.
squeezelite puts the received audio data stream taken from the OS network layer into
the stream buffer first. The OS itself also has buffers for managing its network stack.
These networking buffers are even being used before the stream hits squeezelite.
Yep. There are plenty of buffers in such a streaming chain. And all these buffers have an impact on the stream!
The squeezelite internal processing stages e.g. flac-pcm conversion or resampling
will then be executed fed by the squeezelite streaming buffer content.
The result - the "almost" fully processed data gets stored in the squeezelite output buffer.
The data will be stored at 32bit in that output buffer - always @ 32bit !
The two things that'll still happen after the data leaving the output buffer is
20000:300000 would also do.
will then be executed fed by the squeezelite streaming buffer content.
The result - the "almost" fully processed data gets stored in the squeezelite output buffer.
The data will be stored at 32bit in that output buffer - always @ 32bit !
The two things that'll still happen after the data leaving the output buffer is
- the SW volume control
- bit-depth adjustments according to the audio interface capabilities as reported by the driver.
20000:300000 would also do.
That means we look at a 20 MByte stream buffer and a 500MB or 300 MByte output buffer.
Why is the squeezelite output buffer that big?
It's one of the crucial tweaks while running squeezelite:
Full-File-Ram-Playback
What are we actually doing here !?!? A 500MegaByte buffer.
We basically configure a Full-File-RAM-Playback scenario.
What happens with such a configuration is that squeezelite reads and bulk-processes the entire audio file as soon as you push the PLAY button.
That process will take just a few seconds for the entire track. You'll see a high peak load on the CPU during these first couple of seconds of playback and then load dies down to 0.3% CPU load or similar. Pretty much nothing. The fully processed file gets played back from that RAM buffer! You can improve that even further if you use the volume control on your DAC or amp. There'd be pretty much no data changes once the audio track sits in the output buffer.
Let's assume a typical 44.1/16 5min track encoded as flac would be around ~14MBs in size . Let's assume the uncompressed flac would be about ~20MBs.
Fully processed it'd then require about a 40MByte RAM buffer. Doubled because the processed track gets stored as 32bit!
For HiRes tracks you'd obviously need much more buffer space. You can do the math.
300MB would still get you plenty of headroom. I mean the RAM size is the limit. 500MB simply won't harm on a 4GB RPi4 running pCP.
However. For DSD you better forget RAM buffering. You can do the math if you like. With DSD you enter the GB buffer arena. A NoGo.
A typical CPU load during RAM playback will be around 0.3% on a RPi 4B.
If you'd run e.g. 10000:10000 you pretty much would see 3-5 times higher continuous load during playback. A lot of hold-and-wait situations would drive the load up on a realtime stream.
As you can see this very well supports the overall project focus to look for higher efficiency - paving the road for the stream.
Note:
Note:
For streaming services like Tidal, Spotify etc., FullFile RAM playback might not work.
Just use a 10000:20000 setting or similar. I do know that it works on Qobuz.
Just use a 10000:20000 setting or similar. I do know that it works on Qobuz.
To be honest I can't experience any differences between Qobuz and my local data with RAM playback in place.
With this you can tell squeezelite what codecs to load and in what order.
5. Restrict codec setting
With this you can tell squeezelite what codecs to load and in what order.
The order of codecs as listed in the "Restrict Codec Setting" field for squeezelite,
defines the order of streaming/conversion rules applied by the LMS server towards the
streaming client. Uuh.
defines the order of streaming/conversion rules applied by the LMS server towards the
streaming client. Uuh.
Example:
squeezelite - restricted codecs
pcm,flac,mp3
LMS- file types menu
As you can see 3 rules are active on LMS for FLAC.
A flac file therefore can be streamed as FLAC, MP3 or PCM/WAV
Without using this "Restrict Codec Setting" field to redefine codec priorities on squeezelite a flac-file would be streamed "FLAC-Native". That's the hardcoded default setting.
Now. By putting pcm in the first position of the Restrict Codes field, we change these default routing rules.
With pcm first in the list on your RPI, LMS would stream a flac file converted to pcm down to your RPi. The conversion takes place on the server. And not on the RPI in this setup.
The lack of flac to pcm conversion on the client means of course less work for and load on the client.
With Full-File-Ramplayback in place though I do not see a big difference, since the flac gets bulk-decoded right at the beginning of playback.
However. Play around with these kind of settings. You might come to different conclusions.
6. Various input
1. "-W" = Read stream parameters from PCM header
Basically "-W" allows server based resampling on PCM streams.
While using e.g. LMS based resampling to PCM format, this setting gets important.
The LMS server doesn't know what target sample rate you'd apply. Therefore LMS can't tell squeezelite. squeezelite now needs to figure it out by looking right into the data stream.
That's what -W enables.
In case you'd be streaming down resampled flacs, the data will be extracted from teh lfac container. No need for -W.
2. Use HW/DAC internal volume control
Basically "-V Master" controls the "Master" volume control as being offered by the driver.
The name "Master" is freely chosen by the designer who wrote the driver.
For the Allo Boss it would be "-V Digital".
I use this HW VC to avoid having two digital volume controls (squeezelite+DAC) in
the loop.
As mentioned earlier. Unfortunately most USB DACs won't offer that feature.
Especially on ESS SABRE DACs, using the on-DAC volume control is highly recommended.
On ESS Sabre DACs that would also allow to stream DSD and using DAC volume control.
That'll be it for now.
It's mandatory for a complex system to have all parts involved aligned and under control.
This way and only this way you'll end up with a great performing audio streaming system!
Wrap-Up
That'll be it for now.
It's mandatory for a complex system to have all parts involved aligned and under control.
This way and only this way you'll end up with a great performing audio streaming system!
I hope we accomplished quite a bit at this point.
Reminder: Once in a while check your card settings - these somehow tend to get changed over time with pCP! And also check your LMS settings once in a while.
Reminder: Once in a while check your card settings - these somehow tend to get changed over time with pCP! And also check your LMS settings once in a while.
Of course above settings pretty much apply to all squeezelite installations out there - not just the one which comes with piCorePlayer.
If you'd run e.g. Moode Audio you could basically apply the same settings. The configuration dialog might look a bit different though.
Enjoy.
Great article. I use Picoplayer under RPI 4 into ifi Zen Dac & Amp into balanced Senn HD650. At the beginning I dont like the sound as for me the sound is too thin & bright. Then I followed most of your instruction & the improvement is huge even if I'm not sure which parameter affects the most. I can't thank you enough for your sharing..hope for more interesting articles from you.
ReplyDeleteBuffer settings of 20000:500000, and say bye-bye to a lot of treble graininess :)
ReplyDeleteExcellent article. Thank you!
ReplyDeleteAs a recent convert from Volumio to PiCorePlayer, I was initially disappointed by the sound. It was soft, rounded, lacking dynamics. I thought it might have to do with using DSP in LMS so I streamed to another streamer device that I own and bam! the sound is back, so I knew it had to do with SqueezeLite. After a bunch of digging, came across this article, followed the recommendations and the sound is great again. BTW, running an Allo Boss DAC into a Fosi BT20 amp. One minor niggle is that the VU meters ceased to function since alsa output is purely digital now. At least that’s my assumption. I feared that I might have to return to Volumio to get the sound back. I’m so happy that I just ordered an Innomaker 9038 DAC hat for my toy. Bet it would sound even better through a 3E-A5 amp………
ReplyDelete